This is a quick post to show you my treasured nativity scene which this year has a new stable, made for me at a pottery class by my 83 year old neighbour/friend.
Wishing you all a Happy Christmas!
~A
Saturday, December 24, 2011
Wednesday, December 21, 2011
A Surprise Gift
Tuesday, December 13, 2011
Make Fill Your Own Christmas Crackers
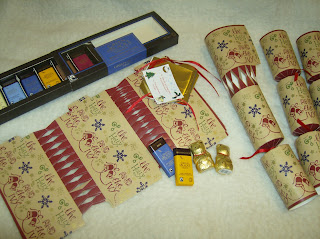
This year I have decided to fill my own Christmas crackers because I hate the cheap and nasty contents of ready filled Christmas crackers. I bought a make your own kit and have filled the crackers with chocolates.
Each cracker contains either two mini slabs or two mini bears depending on the recipient.
All done!
See my Christmas 2013 crackers here!
~A
Note for Crafty Girls:
Yes they pop like normal store bought crackers! This is what the back of the pre made up cracker looks like
Each cracker contains either two mini slabs or two mini bears depending on the recipient.
All done!
See my Christmas 2013 crackers here!
~A
Note for Crafty Girls:
Yes they pop like normal store bought crackers! This is what the back of the pre made up cracker looks like
Friday, December 9, 2011
Birthday Time
November and December is a busy time for birthdays in our house with all four of us having birthdays in these two months. As a result it is also a busy time for making cards. Here are my latest creations, firstly my daughter's card
Inside her card was a little surprise...
She had wanted a hoodie from a certain shop and I had given her the money to buy it before her birthday. On her birthday I wanted her to have a little reminder of what her gift was so I wrote inside the card 'Open to see your present'...
She was very impressed with it which made me happy because she doesn't share my passion for crafts.
Next, my son's card
The green frame around the teddy was cut from tissue paper and then crumpled. Aren't the little metal spanners and hammer cute? (Woodware brads). The tyre print background was made by rolling tyres (old toy cars) over an inkpad and then rolling over card.
I also made my first Christmas card
All pictures are coloured with koh-i-noor pencils blended with solvent. I'm still not very good at getting the shadow/light correct but I do enjoy all the practise!
~A
Inside her card was a little surprise...
She had wanted a hoodie from a certain shop and I had given her the money to buy it before her birthday. On her birthday I wanted her to have a little reminder of what her gift was so I wrote inside the card 'Open to see your present'...
She was very impressed with it which made me happy because she doesn't share my passion for crafts.
Next, my son's card
The green frame around the teddy was cut from tissue paper and then crumpled. Aren't the little metal spanners and hammer cute? (Woodware brads). The tyre print background was made by rolling tyres (old toy cars) over an inkpad and then rolling over card.
I also made my first Christmas card
All pictures are coloured with koh-i-noor pencils blended with solvent. I'm still not very good at getting the shadow/light correct but I do enjoy all the practise!
~A
Tuesday, October 18, 2011
Birthday Wishes
Oops! I promised to show this card yesterday but forgot! I made it for a trendy friend who enjoys going to rock concerts - I think the background paper is very fitting.
The gold leaf on the tag is from some cheap jewellery. The image is coloured with Koh-i-noor pencils, I really battle to get the shading right, what should be shadow and what should be light. Does anybody else battle with this?
~A
The gold leaf on the tag is from some cheap jewellery. The image is coloured with Koh-i-noor pencils, I really battle to get the shading right, what should be shadow and what should be light. Does anybody else battle with this?
~A
Sunday, October 16, 2011
Meow
I see it's been quite a while since my last post!!
I've been doing some card making, this one for my Aunt who loves cats
I had in mind to use rusty staples to make the two 'X's but I didn't have anything like that so I used two thin strips of card instead. I guess I could also have stitched them with thread.
Don't you love the little fish bone? It came inside a packet of animal buttons that I bought a few years back
I'll be back tomorrow to share another card that I finished this evening. See you soon!
~A
Tuesday, January 25, 2011
Subscribe to:
Posts (Atom)